


Ready in a weekend: Garden privacy ideas for UK gardens
Posted by Amy Hall on 7th Sep 2026
Ready in a weekend: Garden privacy ideas for UK gardens
The quickest privacy wins come from decorative panels and moveable planters, both up within a weekend, while hedges and pleached trees take longer but reward you with a screen that only gets better with age. Speed trades against permanence, and solid screens trade against light and airflow, so the right choice depends on what you’re screening and how soon you need it done. Below you’ll find a shortlist, the practical detail behind each idea, and a simple checklist to help you decide.
TL;DR:
- Fast-growing hedges like Leylandii or laurel provide reliable privacy after about three years and require regular pruning to maintain shape.
- Pleached trees offer a vertical privacy solution for upper windows but demand annual shaping and typically cost more upfront.
- Layering different materials, such as combining hard panels with planting, creates a natural, resilient screen that improves over time, often within two to three seasons.
- Reusable and movable options like planters with trellis or bamboo rolls are best for short-term needs, renters, or small spaces, lasting three to five years at most.
- Integrating native, wildlife-friendly plants with structural screens enhances ecological benefits and ensures the privacy solution adapts to changing garden conditions.
Table of Contents
- Garden privacy ideas at a glance
- How to build each screening idea properly
- Choosing the right privacy solution for your garden
- Making privacy features look like they belong
- What privacy screening does to garden wildlife
- DIY installation: what you actually need for each screen type
- Matching plants to your soil and local conditions
- Layering methods for privacy that actually holds up
- Getting garden privacy right means matching methods, not chasing one
- Furnishing your privacy project with Great Gardens Online
- Sources
Garden privacy ideas at a glance
Some of these deliver privacy the day you install them; others take a season or two to fill out properly. Match the option to your patience level and your budget before you commit.
- Fast-growing hedge (e.g. Leylandii, laurel, beech) — best for long-term, low-maintenance screening once established.
- Clumping bamboo — best for a soft, textured screen in a narrow border.
- Pleached trees — best for blocking upstairs windows without losing the whole garden to shade.
- Slatted timber screen — best for a contemporary look with good airflow.
- Laser-cut metal panels — best for style-led gardens that want a statement feature, not just a barrier.
- Reed or bamboo rolls — best for renters and quick budget cover.
- Moveable planters with trellis — best for patios, decking, and anyone who wants to reposition privacy as the sun moves.
- Pergola with side screens — best for combining shade, structure, and privacy in one build.
- Willow hurdles or reclaimed pallet screens — best for a rustic, low-cost DIY project.
- Layered planting with climbers — best for gardens that want privacy to look like planting, not fencing.
Most gardens end up using two or three of these together rather than relying on a single fix, which is worth bearing in mind before you buy anything.
How to build each screening idea properly
Living screens: hedges, pleached trees, and climbers
An evergreen hedge is still the most dependable long-term answer to garden privacy, mainly because it doesn’t stop working in winter. Laurel, Leylandii, and Photinia all give you year-round cover, while beech and hornbeam hold their bronzed leaves through the colder months even though they’re technically deciduous. Whichever species you pick, spacing plants at 60 to 80% of their mature width fills the row faster without the overcrowding that invites fungal problems later.
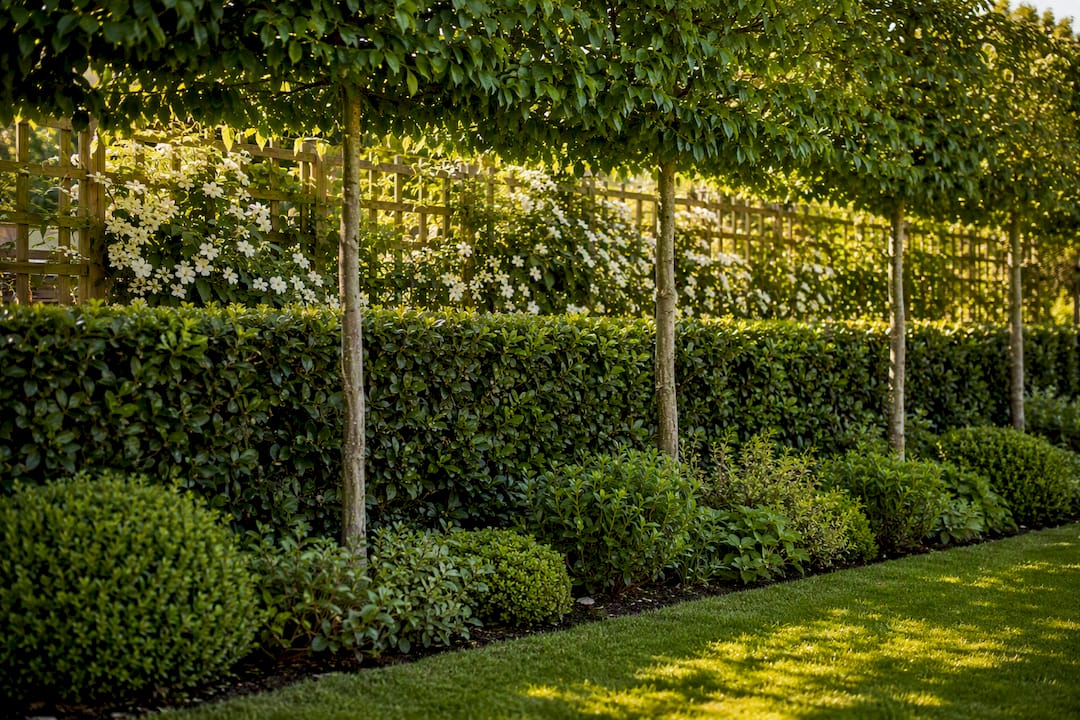
Pleached trees solve a different problem: the upstairs neighbour who can see straight into your garden. The RHS recommends pleaching crab apple or hornbeam trained on a flat frame, giving you a clear stem at eye level with a dense canopy above it, right where the sightline actually needs blocking. It requires annual pruning to keep that shape, and it costs more upfront than a hedge, but it screens a first-floor window without shading everything beneath it.
Climbers earn their place on a trellis or wire framework rather than as a standalone screen. Clematis, jasmine, and evergreen climbers like Trachelospermum fill gaps between other plantings and soften hard structures within a season or two.
Hard screens: timber, metal, and woven panels
Slatted timber panels let air and light through while still breaking up a direct view, which the RHS points out makes for a more comfortable outdoor space than a solid fence in a sheltered garden. Laser-cut metal panels do a similar job but bring a decorative pattern into play, so they double as a design feature rather than a defensive wall. Both need weatherproofing checked every couple of years; timber wants re-oiling, metal wants a rust check if it isn’t corten or galvanised.
Bamboo and reed rolls are the cheapest hard screen you can buy, clipped to an existing fence or a simple post frame in an afternoon. They won’t outlast a timber panel, typically lasting three to five years before they need replacing, but the low upfront cost makes that trade-off easy to accept for a rental or a garden you’re not staying in long-term.
Flexible and small-space solutions
Moveable planters solve the problem nobody plans for: the screen you need in July isn’t the one you need in January. RHS guidance backs container planting and wheeled planters as a reactive option you can shift around the patio as the sun and the neighbours’ sightlines change. Add a trellis topper and a climber, and a single large pot becomes a genuine screen within one growing season.
Renters and small-garden owners get the most out of this category. Retractable fabric sails, hanging baskets on a pergola frame, and freestanding trellis screens all deliver privacy without a single hole drilled into someone else’s fence.
Budget and temporary fixes
Willow hurdles and reclaimed pallet screens are the two cheapest routes to a finished-looking boundary. Willow hurdles weather to a soft grey and last around five to seven years if kept off wet ground; pallets need sanding and treating first but cost next to nothing if you can source them free. Neither is a permanent fix, but both buy you a season or two of decent privacy while you plan something more lasting.
Choosing the right privacy solution for your garden
Start by sitting where you actually spend time, not standing in the middle of the lawn, and note exactly where the sightline into your garden comes from. Upstairs windows next door need height; a ground-floor patio overlooked by a side path needs something closer to eye level. Check which way the prevailing wind comes from too, since a solid screen in an exposed garden can create turbulence rather than shelter.
Six steps to get it right:
- Measure the sightline from both sitting and standing positions, and check upstairs windows separately.
- Pick a solution based on speed needed, budget, and how permanent you want it.
- Check whether you need planning permission before you build anything higher than 2 metres, which is the threshold most local authorities work to for freestanding structures.
- Prepare the ground: dig and improve soil for planting, or lay a level base for panels and posts.
- Install or plant, staggering rows where you’re using hedging so the screen fills faster.
- Maintain on a schedule: prune hedges in late winter and again in midsummer, and check panels annually for weather damage.
A rough maintenance and growth timeline:
- Year one: water new plants weekly in dry spells; expect thin cover, not full privacy.
- Year two: hedges and climbers start filling gaps; feed with a balanced fertiliser in spring.
- Year three: most fast-growing hedges and pleached trees reach a workable screening height, though pleached trees need that annual prune to hold their shape from here on.
Making privacy features look like they belong
The best garden privacy solutions rarely look like privacy solutions at all. A slatted screen painted to match your fence, or a laser-cut panel with a pattern that echoes your planting, reads as a design choice rather than a defensive measure. That’s the real difference between a garden that feels closed off and one that simply feels finished.
Match materials to what’s already there. A cottage garden with informal borders suits willow hurdles and a loose hedge far better than a sharp-edged metal panel, while a minimalist courtyard with clean lines carries laser-cut steel or slatted cedar without looking like an afterthought. Colour matters just as much as material: a screen painted in the same tone as your fence recedes into the background, while one left untreated or in a contrasting shade draws the eye and becomes the focal point whether you wanted it to or not.
Height and rhythm count too. Breaking up a single tall run of fencing with planting at varying heights, from low box balls to a mid-height grass to a taller climber, gives the eye somewhere to land instead of registering one flat wall. Adding low-level lighting along a planted border extends that effect into the evening, and it’s worth thinking about how landscape lighting works with planting beds if you want the screen to look as good after dark as it does at 3pm on a Sunday.
What privacy screening does to garden wildlife
Living screens do far more for local wildlife than a fence panel ever will, which is one of the strongest arguments for a plant-first approach. Garden professionals increasingly recommend planting over an immediate fence partly because hedges and climbers support birds, pollinators, and small mammals in a way that solid timber or metal simply can’t.
A dense hedge gives nesting birds cover and a source of insects; a flowering climber feeds bees and hoverflies through spring and summer; berries on hawthorn or holly hedging feed birds right through winter when food is scarce. Even a bamboo screen, while less useful ecologically than a mixed native hedge, still offers shelter that a blank fence panel doesn’t.
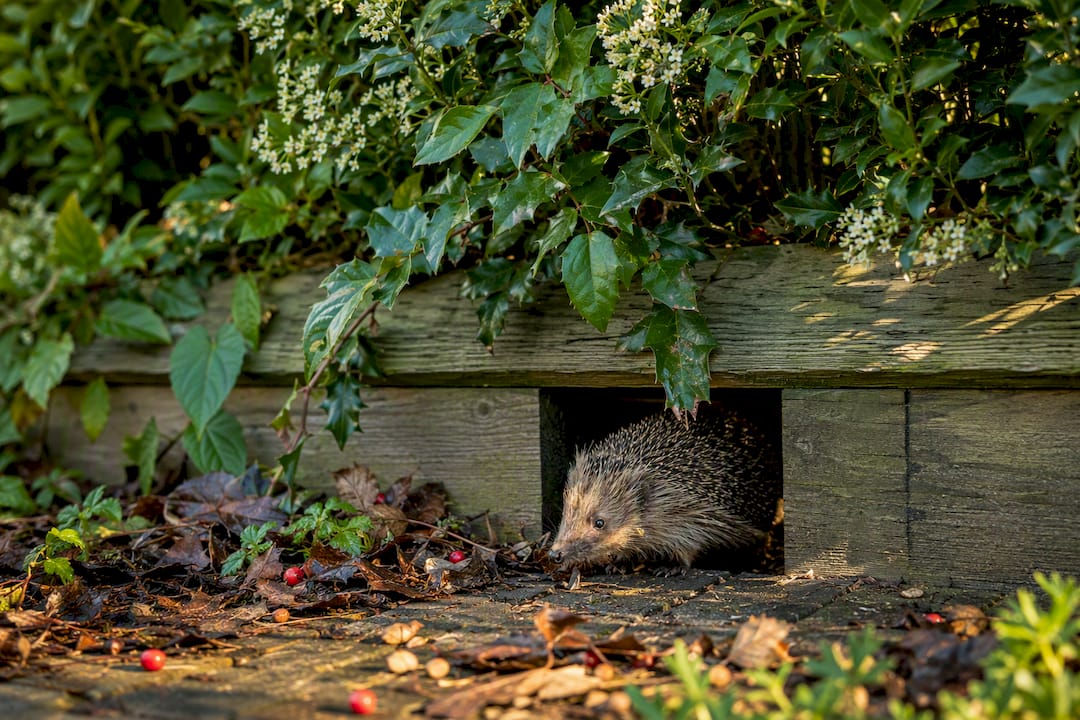
Hard screens aren’t wildlife-hostile by default, though. Leave small gaps at the base of a solid panel or fence, and hedgehogs and other ground-dwelling creatures can still pass through your garden on their usual routes, which matters more than most people realise given how fragmented urban gardens have become. Combining a permeable screen, like slatted timber, with planting either side gives you the best of both: privacy that doesn’t cut your garden off from the wider ecosystem around it.
If biodiversity matters to you, prioritise native or near-native hedging species over ornamental or non-native alternatives where the growing conditions allow it, and resist the urge to strip out an established boundary hedge purely for a faster-growing replacement.
DIY installation: what you actually need for each screen type
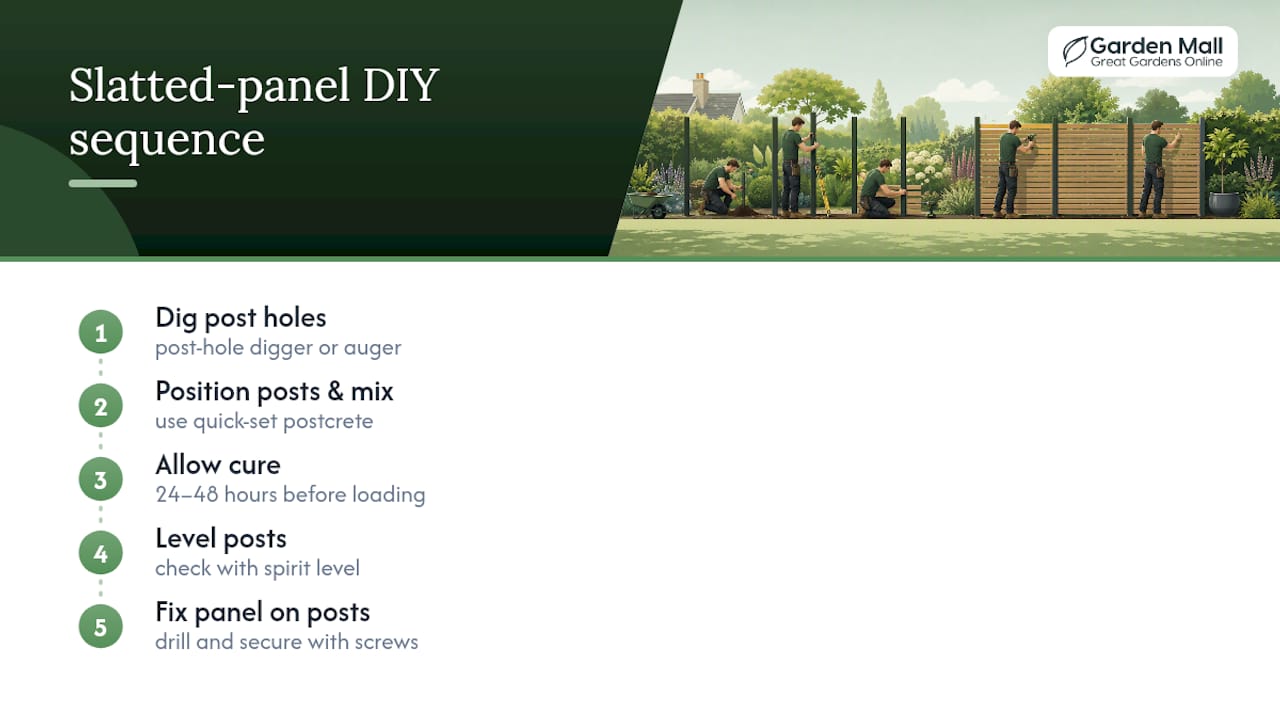
Fitting a slatted timber panel yourself needs a post-hole digger or an auger, quick-set postcrete, a spirit level, and a decent drill for fixing the panel to the posts once they’re set. Concrete needs roughly 24 to 48 hours to cure properly before you load the panel onto the posts, so plan the job across a weekend rather than a single afternoon.
Reed and bamboo rolls are the easiest install in this entire list. Cable ties or galvanised wire fix the roll to an existing fence or a simple frame of timber battens, and the whole job takes an hour or two with nothing more than pliers and a staple gun.
Planting a hedge properly starts with preparing a trench roughly twice the width of the rootball, working in well-rotted compost or manure, and staking taller specimens against wind rock in their first year. A garden fork, a decent spade, and stakes with soft tree ties cover most of what you need; bare-root hedging (typically available from late autumn through winter) is significantly cheaper than container-grown plants if you’re screening a long boundary.
Pleached trees need the most specialist input of anything on this list. The RHS notes they require annual pruning to hold their trained shape, and getting the initial framework right is genuinely worth paying a professional for, even if you maintain it yourself afterwards. A poor first cut can set the tree’s structure back years.
Matching plants to your soil and local conditions
Privacy planting fails most often not because the design was wrong, but because nobody checked the soil first. Heavy clay drains slowly and suits hornbeam, beech, and most native hedging species; light, sandy soil drains fast and favours drought-tolerant options like bamboo or certain viburnums, which will struggle and yellow in permanently waterlogged clay.
A simple jar test tells you what you’re working with: dig a hole, fill it with water, and time how long it takes to drain. Anything under an hour is fast-draining sandy soil; anything over four hours points to heavy clay that needs organic matter dug in before planting.
Exposure matters just as much as soil type. A coastal or hilltop garden facing prevailing winds needs tougher, wind-resistant species such as escallonia or tamarisk, while a sheltered urban courtyard can support more delicate climbers and ornamental grasses that would get shredded further inland. North-facing boundaries that see little direct sun rule out sun-loving climbers like wisteria in favour of shade-tolerant ivy or Virginia creeper.
Before committing to a hedge that will take three years to mature, it’s worth checking your soil pH too. Most privacy hedging tolerates a fairly wide range, but acid-loving species like some viburnums will sulk in strongly alkaline soil, and lime-loving beech struggles on very acidic ground. A cheap pH testing kit from a garden centre saves you from finding this out the expensive way, after you’ve already planted forty metres of hedge.
Layering methods for privacy that actually holds up
Relying on one screen to do the whole job is the most common mistake in garden privacy, and it’s usually the reason a “finished” screen still feels exposed. Combining hedges, planters, and structural elements fills the gaps a single hedge or fence panel always leaves, particularly at ankle height and around gate openings where sightlines sneak through.
A practical layering approach starts with a slatted or laser-cut panel as the structural backbone, since it gives you privacy from day one while everything else grows in. Plant a hedge or a row of large shrubs directly in front of it, and the panel disappears behind foliage within two or three seasons, leaving you with a screen that looks entirely natural. Add moveable planters with trellis toppers to plug any remaining gaps, particularly around seating areas where the sightline changes depending on exactly where you’re sitting.
One installer trick worth borrowing: plant your privacy screen in two staggered rows rather than one straight line, with a closer row and a set-back row behind it. The screen reads as full almost immediately, and you keep access behind the front row for pruning and maintenance without trampling the display side.
Mixing plant species within that layered approach also protects you against disease or pest problems wiping out an entire boundary at once, which is a real risk with a single-species hedge like Leylandii. A blend of evergreen and deciduous, flowering and structural, tall and low, gives you resilience as well as visual interest across the seasons.
Getting garden privacy right means matching methods, not chasing one
Most advice on this topic pushes readers towards a single “best” solution, and that’s the wrong way to think about it. Landscape professionals consistently land on the same conclusion: a mix of permeable planting and selective hard screening beats any single barrier, because it solves the light, wind, and sightline problems that one fence panel can’t solve on its own. The gardens that feel genuinely private, rather than just fenced in, are almost always the ones running two or three methods together.
What people underestimate is how much a hard screen helps the planting around it, rather than competing with it. A slatted panel gives you privacy on day one and quietly disappears once the hedge in front of it matures, which is a better sequence than waiting three years for a hedge to do the whole job alone.
Pro Tip: Pair an evergreen structural plant, like a clipped Portuguese laurel or a column of Irish yew, with a fast seasonal climber such as clematis or sweet pea on a trellis behind it. You get year-round structure from the evergreen and a burst of extra cover through the growing season from the climber, so the screen never looks thin, even in its first year.
— Peter
Furnishing your privacy project with Great Gardens Online
Great Gardens Online gives you one place to buy the hardware for every idea in this article, rather than hunting across separate suppliers for planters, panels, and finishing touches. Once you’ve decided where hedging meets hard screen, or where a moveable solution fills a gap, the practical shopping list is short: large trellis-ready planters for climbers and staggered rows, decorative panels for the structural backbone, and outdoor décor that ties the whole layered look together.
Delivery is free on orders over a certain amount, and returns are straightforward if a size or finish doesn’t suit your space once it’s in place. Customer ratings reflect that consistency, which matters when you’re trying to plan a garden project around delivery dates rather than around a supplier’s schedule. Browse the Garden Mall for planters, trellis accessories, and screening décor, and start with whichever piece solves your most immediate sightline problem first.
